|
|
|
|
Featured Photoshop Tutorials:
|
Deprecated: mysql_connect(): The mysql extension is deprecated and will be removed in the future: use mysqli or PDO instead in /home/appelsin/public_html/kromefx/db_conn.php on line 8
|
|
Deprecated: mysql_connect(): The mysql extension is deprecated and will be removed in the future: use mysqli or PDO instead in /home/appelsin/public_html/kromefx/db_conn.php on line 8
 | | Title: | | Complete Web Page Plus Code | | Author: | kromefx | view all by kromefx | | Category: | Web Layouts | | Level: | Intermediate | | Description: | This tutorial takes you from the initial setup and design of a web site, all the way through producing W3C validated CSS and XHTML 1.0 for layout, while leaving room for integrating your own designs and color schemes. The .PSD is also available for download as well as the code. | | Views: | 325,971 | | Date: | 12/9/2005 | | |
| Page 1 | Page 2 | Page 3 | Page 4 | Page 5 | Page 6 | Page 7 |
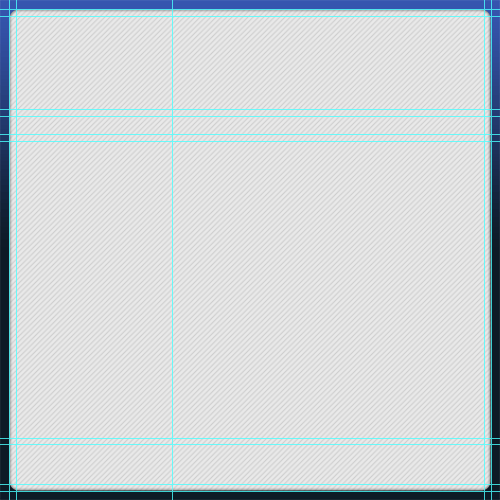
Now let’s start the container. Create a new layer group called container. The container will basically hold everything together visually. Select the Rounded Rectangle Tool  . In the options at the top, make sure you have the Shape Layer option selected, and set your radius. You may use any radius you want, the larger the radius, the more rounded your shape will be. I used 15. Choose whatever color you want to use for the container as your foreground color. I’m using a dim white. Now, draw a rounded rectangle to fit over the outermost guides. If you have everything set correctly, it will snap to these guides and become the perfect shape with ease. You may also want to add a pattern to this portion of the page with the pattern overlay in the blending options. I chose a diagonal scanline pattern with low opacity. How to create this pattern is outside the scope of this tutorial, but there are many, many tutorials you can easily find on how to do this. I also added an inner shadow with a slightly lowered opacity and a distance of 0. Here’s what it looks like so far. . In the options at the top, make sure you have the Shape Layer option selected, and set your radius. You may use any radius you want, the larger the radius, the more rounded your shape will be. I used 15. Choose whatever color you want to use for the container as your foreground color. I’m using a dim white. Now, draw a rounded rectangle to fit over the outermost guides. If you have everything set correctly, it will snap to these guides and become the perfect shape with ease. You may also want to add a pattern to this portion of the page with the pattern overlay in the blending options. I chose a diagonal scanline pattern with low opacity. How to create this pattern is outside the scope of this tutorial, but there are many, many tutorials you can easily find on how to do this. I also added an inner shadow with a slightly lowered opacity and a distance of 0. Here’s what it looks like so far. | |
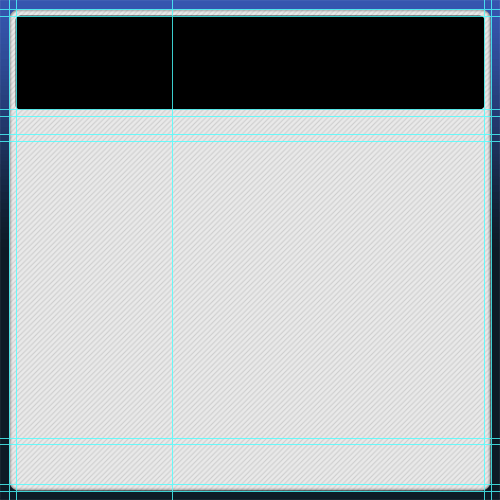
| Next, we’ll move on to the header. Create a new layer group called header. Use the Rounded Rectangle Tool again . I use a radius of 7 from now on. The header will involve several layers with clipping masks. So first we should make the layer that will provide the mask for the rest of the layers to clip to. Use the Rounded Rectangle Tool to draw a rounded rectangle shape in the portion of our guides designate for the header. Add an inner shadow with a distance of 0 and a lowered opacity. You might not see it right now because the color is black, but that’s OK. Right now the color doesn’t matter. It will look like this. | |
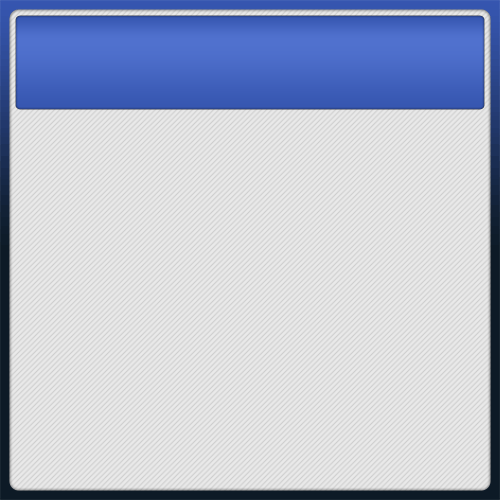
| Now duplicate the layer. Add a clipping mask to this layer by holding down the Alt button and clicking in between the two layers. This will allow the layer styles set on the bottom layer to show through to the upper layers, and also keep the upper layers constrained to the size of the lower layer. Now add a gradient to this layer, and make it colors from your color scheme. I added a simple dark blue, to lighter blue, to dark blue gradient here. I’ve taken the guide lines off so you can see better what is going on. | |
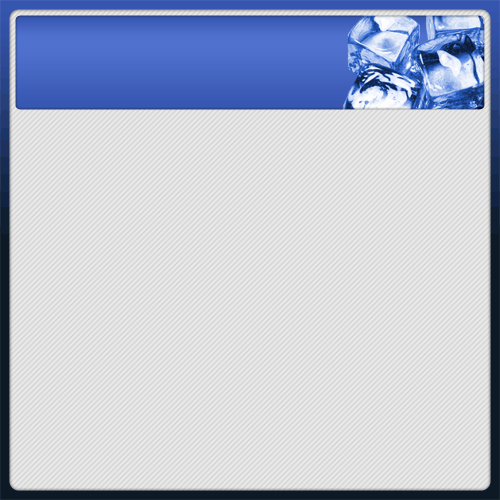
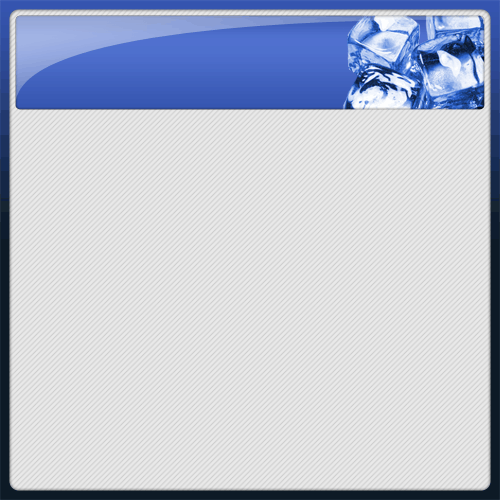
| Now choose some image that is relevant to your web page, but not your logo. This will give your web page some sort of theme. If you’re a hosting company, you could use a server, if you’re selling something, you could use one of your products. I used a picture of ice mainly because it looked cool :). Put the layer directly above the layer created in step 8 and clip it to that layer, by holding Alt and clicking between the two layers. That way if the layer with the picture on it is larger than the header layer, it will not go outside the boundaries of the header. You should now have two layers clipped to the original shape. | |
Now use the pen tool  to draw the glare layer. It is simply a curved line the goes all the way around the rest of the header. You should also clip this layer to the layer below it (which will be the picture layer at this point). Go into blending options and put a white color overlay. Lower the master opacity. You may also want to use a mask to fine-tune it but that is optional. It should look something like this once you’re through. to draw the glare layer. It is simply a curved line the goes all the way around the rest of the header. You should also clip this layer to the layer below it (which will be the picture layer at this point). Go into blending options and put a white color overlay. Lower the master opacity. You may also want to use a mask to fine-tune it but that is optional. It should look something like this once you’re through. | |
| Page 1 | Page 2 | Page 3 | Page 4 | Page 5 | Page 6 | Page 7 |
| Paul 87.212.50.103 | 3/14/2008 @ 6:56pm | Awesome Tut, keep up the good work!
|
Click Here to see the MOST POPULAR tutorials!
|
|
|