|
|
|
|
Featured Photoshop Tutorials:
|
Deprecated: mysql_connect(): The mysql extension is deprecated and will be removed in the future: use mysqli or PDO instead in /home/appelsin/public_html/kromefx/db_conn.php on line 8
|
|
Deprecated: mysql_connect(): The mysql extension is deprecated and will be removed in the future: use mysqli or PDO instead in /home/appelsin/public_html/kromefx/db_conn.php on line 8
 | | Title: | | Making a 40X40 Thumbnail | | Author: | kromefx | view all by kromefx | | Category: | Basics | | Level: | Beginner | | Description: | The simple way to make a great looking 40X40 optimized thumbnail. | | Views: | 24,673 | | Date: | 7/20/2012 | | |
| Page 1 | Page 2 |
| First, take your large picture and open it up in Photoshop. I chose this one because it's much larger than 40X40 and should give you a decent idea of how to do this with any graphic. | |
| Next, resize the image to the smallest you can where you can still make out what the image is. Go to Image>Resize to resize the image. 40X40 was too small for this image because you could not tell what it was. I used 100X100. | |
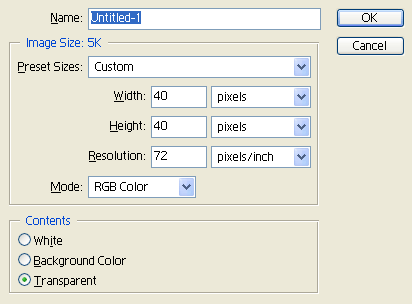
| Now go to File>New to create a new 40X40 image. 72 resolution will be good enough. | |
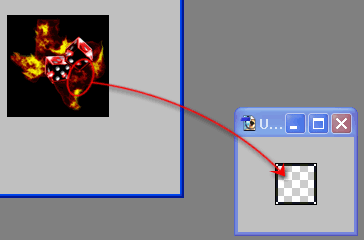
| Now drag the original image into the new 40X40 image you created. Before you can drag, you need to make sure your image is RGB by clicking Image>Mode>RGB Color if it is not already. | |
| Now, move the new layer around until you get a good idea of what the original picture was. It doesn't have to show everything, just enough to give someone a taste of what the original picture is. I chose to show some of the dice, and some of the fire. | |
| Page 1 | Page 2 |
Click Here to see the MOST POPULAR tutorials!
|
|
|