|
|
|
|
Featured Photoshop Tutorials:
|
Deprecated: mysql_connect(): The mysql extension is deprecated and will be removed in the future: use mysqli or PDO instead in /home/appelsin/public_html/kromefx/db_conn.php on line 8
|
|
Deprecated: mysql_connect(): The mysql extension is deprecated and will be removed in the future: use mysqli or PDO instead in /home/appelsin/public_html/kromefx/db_conn.php on line 8
 | | Title: | | The Incredible Pen Tool | | Author: | kromefx | view all by kromefx | | Category: | Basics | | Level: | Beginner | | Description: | A lot of tutorials tell you to use the pen tool; this one will show you HOW to use the pen tool. Creating true vector shapes, partial pixel selections, curvature modification, and saved paths are just some of its features. | | Views: | 113,177 | | Date: | 12/19/2004 | | |
| Page 1 | Page 2 | Page 3 | Page 4 | Page 5 |
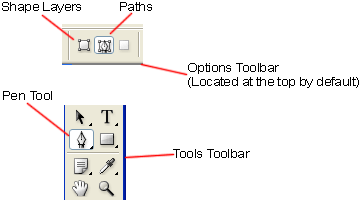
| The pen tool has 2 main functions: Shape Layers and Paths. For this tutorial, we'll be using Paths. Select the pen tool and then make sure you have Paths selected as well. | |
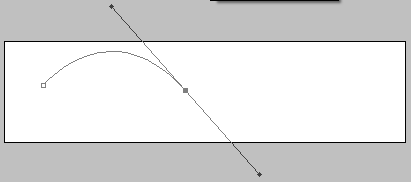
| Now start by drawing a simple curve. Do this by clicking on some point in the image, then clicking and holding in a different spot. While holding the click, move the mouse some and you will see a curve start to form. Let go of the mouse button when you've got the curve you want. | |
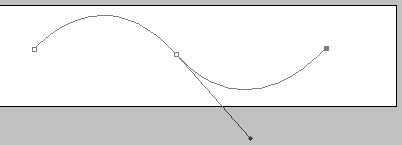
| Now you can click again and repeat the process to create another curve. You'll notice that this time the curve was automatic and followed the general direction of the previous curve. I bet you're wondering how you can change that. | |
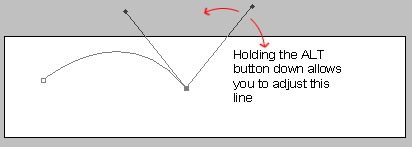
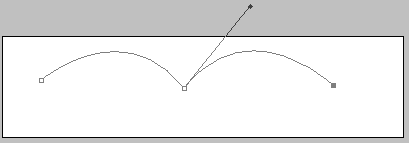
| Let's start over with the first curve. Click somewhere, then click again and drag. Once you get the curve you want, instead of letting go of the mouse button, this time hold down the alt button on your keyboard and move your mouse some. You can dictate which way the next curve will go by doing this. | |
| With the line adjusted, this time when we click for the next point the curve will not be the same. The curve always follows this line we just adjusted -- the longer the line the more sharp the curve will be. The direction of the line indicates which way the curve will go. | |
| Page 1 | Page 2 | Page 3 | Page 4 | Page 5 |
Click Here to see the MOST POPULAR tutorials!
|
|
|


