|
|
|
|
Featured Photoshop Tutorials:
|
Deprecated: mysql_connect(): The mysql extension is deprecated and will be removed in the future: use mysqli or PDO instead in /home/appelsin/public_html/kromefx/db_conn.php on line 8
|
|
Deprecated: mysql_connect(): The mysql extension is deprecated and will be removed in the future: use mysqli or PDO instead in /home/appelsin/public_html/kromefx/db_conn.php on line 8
 | | Title: | | Adding Water to a Picture | | Author: | kromefx | view all by kromefx | | Category: | Designing | | Level: | Intermediate | | Description: | Add water to a picture. Works well in landscape type pictures. | | Views: | 391,147 | | Date: | 2/4/2005 | | |
| Page 1 | Page 2 |
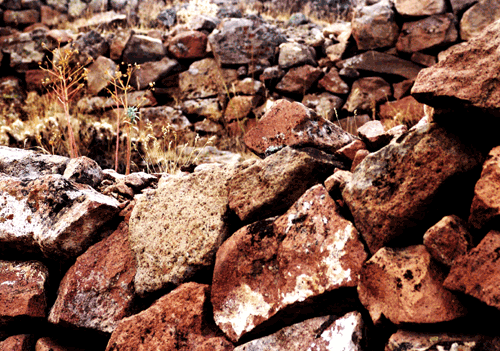
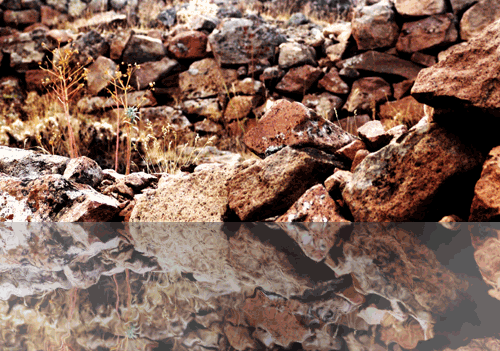
| Open up your image. Landscapes images usually work best with this method, but you can try it on anything. Take a look at the image and see where you would like to put the water, pay special attention to the details such as where water might happen to flow into cracks, crevices etc. | |
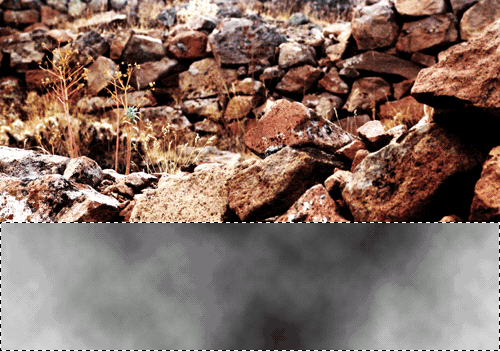
Create a new layer and use the rectangular marquee  to draw a box around the general area where you want the water. Press D for default colors to draw a box around the general area where you want the water. Press D for default colors  then go to filter>render>clouds. Deselect by pressing ctrl-d. then go to filter>render>clouds. Deselect by pressing ctrl-d. | |
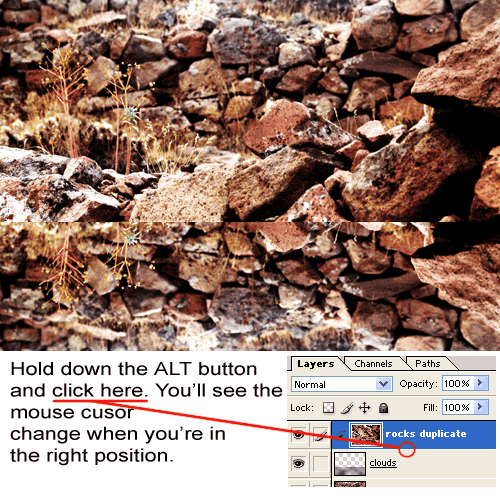
Duplicate the background layer and move the duplicate on top of the clouds layer. Now with the duplicate layer selected, go to edit>transform>flip vertical to turn it upside down. Hold down the alt button on your keyboard and click in between the two layers. This will create a clipping layer  . . | |
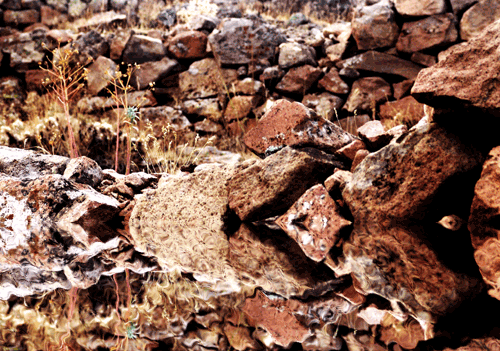
Make sure the duplicate layer is selected and select the Move Tool  . Hold down shift on your keyboard and use the keyboard down arrow to move the image down until it is a 'reflection'. Let go of the shift key and use the down arrow to fine tune the move. . Hold down shift on your keyboard and use the keyboard down arrow to move the image down until it is a 'reflection'. Let go of the shift key and use the down arrow to fine tune the move. | |
| With the duplicate layer still highlighted, go to filter>distort>ripple to give it a little bit of a ripple to taste. I used medium and 100% in this example. Set the opacity down to about 50%. | |
| Page 1 | Page 2 |
Click Here to see the MOST POPULAR tutorials!
|
|
|