|
|
|
|
Featured Photoshop Tutorials:
|
Deprecated: mysql_connect(): The mysql extension is deprecated and will be removed in the future: use mysqli or PDO instead in /home/appelsin/public_html/kromefx/db_conn.php on line 8
|
|
Deprecated: mysql_connect(): The mysql extension is deprecated and will be removed in the future: use mysqli or PDO instead in /home/appelsin/public_html/kromefx/db_conn.php on line 8
 | | Title: | | How to make a Photoshop Brush Collection | | Author: | papu123 | view all by papu123 | | Category: | Textures and Patterns | | Level: | Intermediate | | Description: | Photoshop brushes are great way to do repetitive marks, adding watermark, signature and the most extensively used in digital painting.
This tutorial will simply teach how to make few brushes and make your own brush collection.
| | Views: | 22,964 | | Date: | 3/3/2006 | | |
| Page 1 | Page 2 |
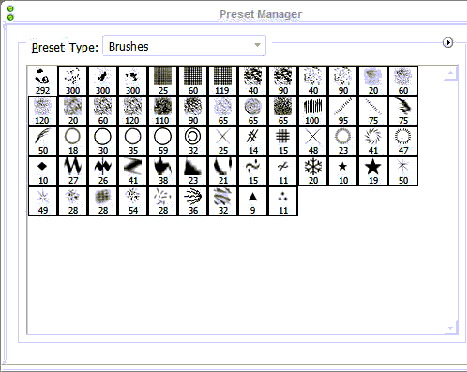
| 2. The Present Manager Window will open. Select Brushes from the dropdown list (generally Brushes is the first in the list and should be selected by default).
3. Press (Control + A) to select all the brushes. Now (Control + Left Click) the first brush. That will deselect that brush. Now click on Delete Button.
| |
| 4. Now click Save Set. Name the set as “Ink Spatter” and click save.
5. Now open the files that we want to make brush from.
6. Select one file. Select Edit > Define Brush Preset.
7. Give the name as Ink1
8. Repeat step 6 and 7 for the other images, and give subsequent names as “Ink2”, “Ink3”,”Ink4”.
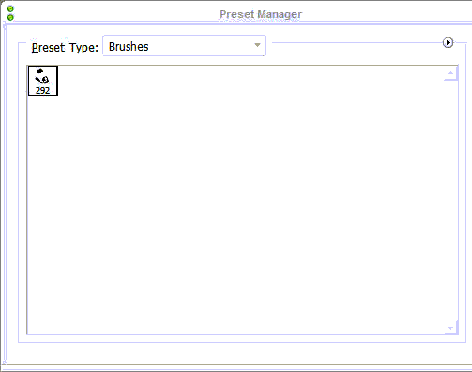
9. Now again open “Preset Manager …”
10. You will be able to see 5 brushes. Select the first brush and Click on delete as we don’t need that brush.
11. Click on “Save set…”
12. Name it “Ink Spatter”
13. Hit yes for the Replace Confirmation Dialog Box.
Your own Brush Preset “Ink Spatter” is ready to use.
| |
| Page 1 | Page 2 |
Click Here to see the MOST POPULAR tutorials!
|
|
|