|
|
|
|
Featured Photoshop Tutorials:
|
Deprecated: mysql_connect(): The mysql extension is deprecated and will be removed in the future: use mysqli or PDO instead in /home/appelsin/public_html/kromefx/db_conn.php on line 8
|
|
Deprecated: mysql_connect(): The mysql extension is deprecated and will be removed in the future: use mysqli or PDO instead in /home/appelsin/public_html/kromefx/db_conn.php on line 8
 | | Title: | | Complete Web Page Plus Code | | Author: | kromefx | view all by kromefx | | Category: | Web Layouts | | Level: | Intermediate | | Description: | This tutorial takes you from the initial setup and design of a web site, all the way through producing W3C validated CSS and XHTML 1.0 for layout, while leaving room for integrating your own designs and color schemes. The .PSD is also available for download as well as the code. | | Views: | 322,883 | | Date: | 12/9/2005 | | |
| Page 1 | Page 2 | Page 3 | Page 4 | Page 5 | Page 6 | Page 7 |
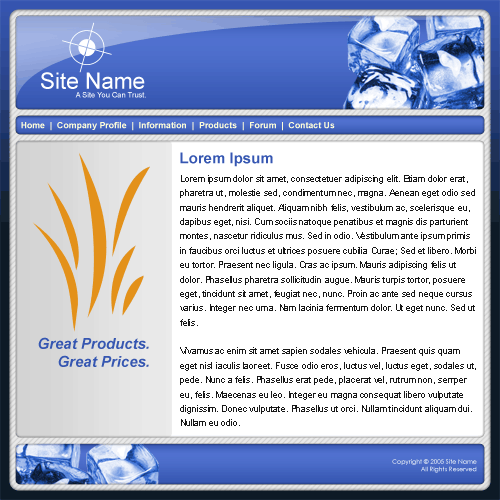
| Ok first off, this is a fast paced tutorial meant for a reader with knowledge of how to use basic Photoshop tools. This tutorial assumes you have some experience with layers and shape layers as well as clipping masks. Only a brief explanation of each will be offered as they are outside the scope of this tutorial. Here is a quick look at what you will end up with (but larger, of course!). | |
| Now let's begin. First and foremost you need a color scheme. It is not good enough to choose colors randomly as you go along and trying to figure out what looks good. There are tools to help you with color schemes. Here are two of my favorite: Color Picker and Colourlovers. Often times I will create a new layer with the color samples of my chosen color scheme for quick access. You may also use swatches to accomplish the same thing. I leave it up to you to substitute the colors I use with the colors you have chosen. For this particular example, I have gone with a blue monochromatic color scheme which is possibly one of the most overused color schemes on the internet. I choose this scheme in hopes that you would find it boring and opt to use your own color scheme instead! |
| Now that you have your colors in mind go ahead and create a new document. It should be 800 X 800 pixels. According to web standards, web pages should be no wider than 770 pixels due to a still large number of users who use 800X600 resolution. We have made this one 800 pixels wide to account for the creation of a background for the entire page. |
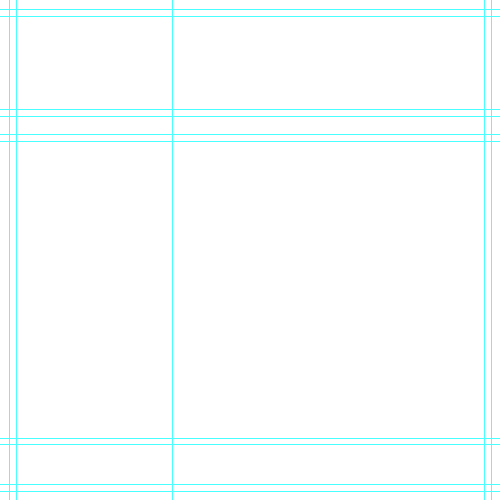
| Now that you have your document, you need to set up guides. These guides will be a great asset and assure that all of your creations on the page are lined up in exactly the right width, height, and location. To create a new guide go to View > New Guide. You have the option of horizontal or vertical, and a box to type in an amount of pixels. You need to create the following horizontal guides: 15, 25, 175, 185, 215, 225, 700, 710, 775, 785. You also need to create the following vertical guides: 15, 25, 275, 775, 785. You can toggle viewing the guides or not by pressing CTRL and ; together. You also need to make sure that View > Snap is check marked, and that View > Snap To > Guides is also check marked. When you’re finished, it should look like the image below. | |
| Ok. For each different part of this project, I’m going to create a new layer group (or layer set if you’re using version 7). I advise that you do the same to keep it organized, but it’s up to you and won’t make a difference on the end result (except for readability and ease of navigation throughout your file). Create a new layer group called background. You should create a new layer and fill this layer with any color, it won’t matter as we will change it to a gradient. Now go into blending modes of this layer. Click on gradient and add a vertical darker-colored gradient. If it is not exactly vertical, then it will not work with the code given at the end of this tutorial. | |
| Page 1 | Page 2 | Page 3 | Page 4 | Page 5 | Page 6 | Page 7 |
| Paul 87.212.50.103 | 3/14/2008 @ 6:56pm | Awesome Tut, keep up the good work!
|
Click Here to see the MOST POPULAR tutorials!
|
|
|