|
|
|
|
Featured Photoshop Tutorials:
|
Deprecated: mysql_connect(): The mysql extension is deprecated and will be removed in the future: use mysqli or PDO instead in /home/appelsin/public_html/kromefx/db_conn.php on line 8
|
|
Deprecated: mysql_connect(): The mysql extension is deprecated and will be removed in the future: use mysqli or PDO instead in /home/appelsin/public_html/kromefx/db_conn.php on line 8
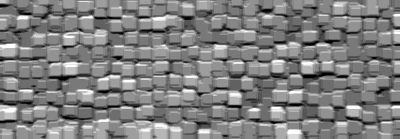
 | | Title: | | Stonewall Text | | Author: | kromefx | view all by kromefx | | Category: | Text Effects | | Level: | Beginner | | Description: | Make some text that looks like it was built with a stone wall from a castle. | | Views: | 25,349 | | Date: | 12/20/2004 | | |
| Page 1 | Page 2 |
| Make a new image and fill the background layer with black. Go to filter>texture>patchwork and use square size around 10 and relief of about 8. It won't appear to do anything, but we'll bring out the stones in the next step. |
| Go to image>adjustments>auto levels and you should see the stones come into view. You can also use image>adjustments>levels if you want to control for yourself the levels. | |
| Get out the text tool and choose a thick font. Write whatever text you want. | |
| Now ctrl-click the text layer to make a selection of the text. Click on the background layer and press ctrl-c to copy, ctrl-n to create a new image (hit OK), and finally ctrl-v to paste. | |
| Now all that's left is some blending options. Adjust them to taste. I used a default drop shadow, a 1px black inner stroke, and a chisel hard bevel. | |
| Page 1 | Page 2 |
Click Here to see the MOST POPULAR tutorials!
|
|
|